今回はアイテムのUIを作成していきたいと思います。
アイテムのリストを作るのにScreenViewを使います。ScreenViewの階層下にあるContentsに、所持数が1以上のアイテム名のTextコンポーネントを保持したゲームオブジェクトを追加していきます。
ヒエラルキーに新しくCanvasを作成し、名前をItemUICanvasにします。ItemUICanvasの階層下に「UI」→「ScrollView」を作成。ItemUICanvasのSortOrderを3に設定。ScrollViewはColorを適当に変更し、ScrollRectコンポーネントのMovementTypeをClampedに変更し、HorizontalScrollbarをNoneに変更。そしてScrollView階層下のScrollbarHorizontalを削除します。
新規に空のオブジェクトを作成し、ItemUISystemを作成。新しくItemUIスクリプトを作成してオブジェクト「ItemUISystem」に貼り付けます。コードは以下のようにします。
クリックで展開
using System.Collections;
using System.Collections.Generic;
using System;
using UnityEngine;
using UnityEngine.UI;
public class ItemUI : MonoBehaviour
{
public ItemManager itemManager;
public Canvas itemCanvas;
ItemManager.Item iEnum;
GameObject scrollView;
Transform viewPort;
Transform content;
void Start()
{
scrollView = GameObject.Find("Scroll View");
viewPort = scrollView.transform.Find("Viewport");
content = viewPort.transform.Find("Content");
itemManager.TestInit();
SetItemUI();
itemCanvas.gameObject.SetActive(false);
}
void Update()
{
}
public void SetItemUI()
{
for (int i = 0; i < 20; i++)
{
iEnum = (ItemManager.Item)Enum.ToObject(typeof(ItemManager.Item), i);
if (itemManager.itemCountDictionary[iEnum] == 0)
{
continue;
}
else
{
GameObject Contents = new GameObject("Contents" + (i + 1).ToString());
Contents.transform.parent = content.transform;
var Rect = Contents.AddComponent<RectTransform>();
Rect.transform.localPosition = new Vector3(0, 0, 0);
Rect.transform.localScale = new Vector3(1, 1, 1);
Rect.sizeDelta = new Vector2(0, 100);
Contents.AddComponent<CanvasRenderer>();
Contents.AddComponent<Image>();
Contents.AddComponent<LayoutElement>().preferredHeight = 100;
var buttonState = Contents.AddComponent<Button>();
var colors = buttonState.colors;
if (content.transform.childCount % 2 == 0)
{
colors.normalColor = new Color(0F / 255F, 0F / 255F, 0F / 255F, 128F / 255F);
colors.highlightedColor = new Color(0F / 255F, 0F / 255F, 0F / 255F, 128F / 255F);
colors.pressedColor = new Color(0F / 255F, 0F / 255F, 0F / 255F, 128F / 255F);
colors.disabledColor = new Color(0F / 255F, 0F / 255F, 0F / 255F, 128F / 255F);
}
else
{
colors.normalColor = new Color(0 / 255F, 0 / 255F, 0 / 255F, 50 / 255F);
colors.highlightedColor = new Color(0 / 255F, 0 / 255F, 0 / 255F, 50 / 255F);
colors.pressedColor = new Color(0 / 255F, 0 / 255F, 0 / 255F, 50 / 255F);
colors.disabledColor = new Color(0 / 255F, 0 / 255F, 0 / 255F, 50 / 255F);
}
buttonState.colors = colors;
GameObject text = new GameObject("Item" + (i + 1).ToString());
text.transform.parent = Contents.transform;
var rect = text.AddComponent<RectTransform>();
rect.transform.localPosition = new Vector3(0, 0, 0);
rect.transform.localScale = new Vector3(1, 1, 1);
rect.sizeDelta = new Vector2(900, 90);
text.AddComponent<CanvasRenderer>();
var textChild = text.AddComponent<Text>();
string viewtext = "";
viewtext = itemManager.itemDatas[i].itemName;
string countText = " × " + (itemManager.itemCountDictionary[iEnum]).ToString();
textChild.text = itemManager.itemDatas[i].itemName + countText;
textChild.color = new Color(255f / 255f, 255f / 255f, 255f / 255f, 255f / 255f);
textChild.fontSize = 30;
textChild.alignment = TextAnchor.MiddleCenter;
textChild.font = Resources.GetBuiltinResource(typeof(Font), "Arial.ttf") as Font;
var itemEvent = Contents.AddComponent<itemEvent>();
itemEvent.itemData = itemManager.itemDatas[i];
GameObject itemIcon = new GameObject("ItemIcon" + (i + 1).ToString());
itemIcon.transform.parent = buttonState.transform;
var iconRect = itemIcon.AddComponent<RectTransform>();
iconRect.transform.localPosition = new Vector3(-250, 0, 0);
iconRect.transform.localScale = new Vector3(1, 1, 1);
itemIcon.AddComponent<CanvasRenderer>();
var iconImage = itemIcon.AddComponent<Image>();
iconImage.sprite = itemManager.itemDatas[i].itemSprite;
}
}
}
public void UpdateItemUI()
{
DestroyAllItem();
SetItemUI();
}
public void DestroyAllItem()
{
if (content.gameObject.transform.childCount != 0)
{
foreach(Transform child in content.gameObject.transform)
{
Destroy(child.gameObject);
}
}
}
public void ShowItemUI()
{
SoundManager.instance.PlaySE(6);
UpdateItemUI();
itemCanvas.gameObject.SetActive(true);
}
public void DeleteItemUI()
{
SoundManager.instance.PlaySE(7);
DestroyAllItem();
itemCanvas.gameObject.SetActive(false);
}
publicにしたItemManagerとItemCanvasにそれぞれオブジェクト「ItemManager」とオブジェクト「ItemUICanvas」を貼り付けます。スクリプトの実行内容としては、ItemManagerの全てのアイテムの所持数をチェックして、所持数が1以上のアイテムを ItemUICanvasのScrollViewにアイコン付きのテキストで追加するものです。後で使用時の処理を実装できるようにButtonコンポーネントと新しく作成したItemEventコンポーネントもつけています。
実行すると以下のようになります。

このアイテムのUIをアイテムボタンを押したときに呼び出すようにしたいので、探索時のUIにItemButtonとBackButtonを追加します。
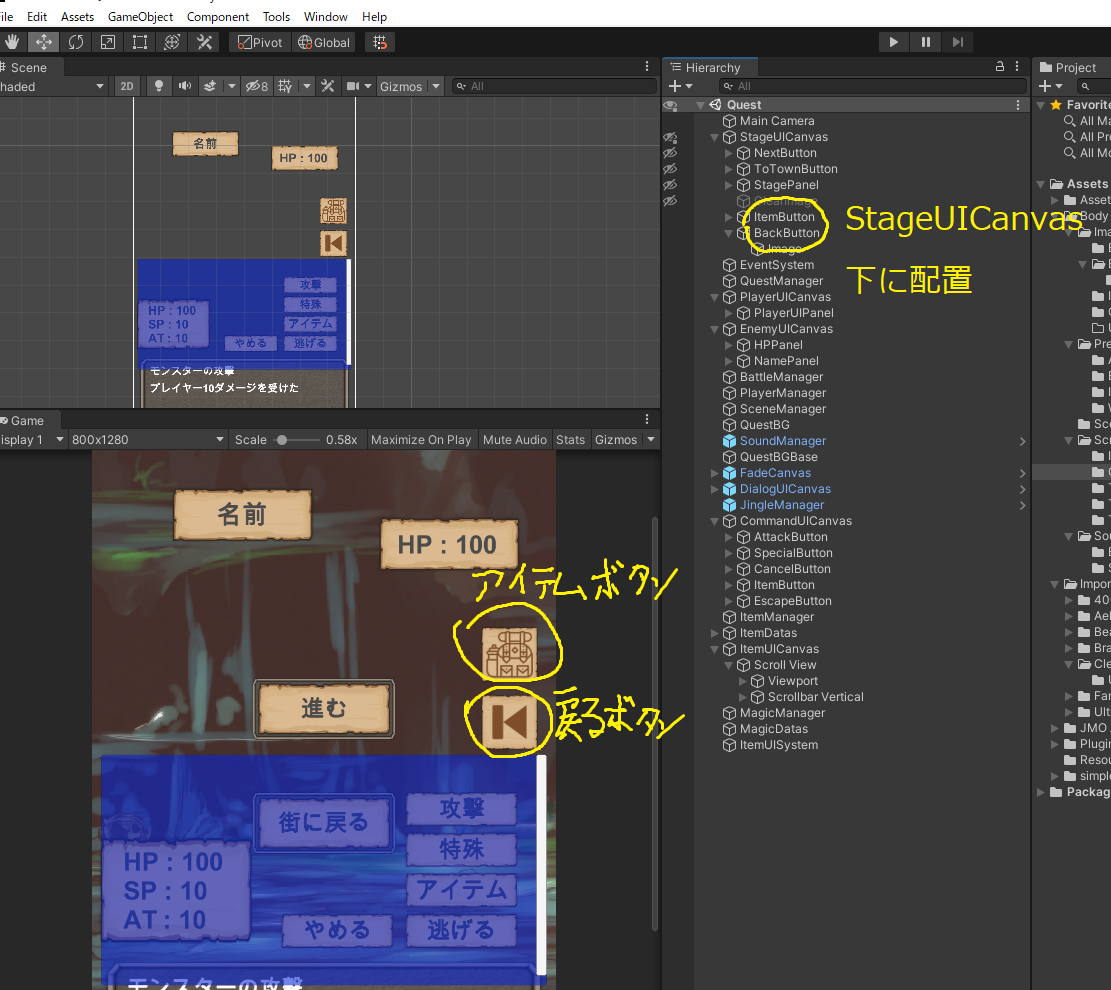
StageUIManagerにアイテムボタンと戻るボタンが押されたときの処理を追加します。
クリックで展開
using System.Collections;
using System.Collections.Generic;
using UnityEngine;
using UnityEngine.UI;
public class StageUIManager : MonoBehaviour
{
public Text stageText;
public GameObject nextButton;
public GameObject toTownButton;
public GameObject stageClearImage;
public GameObject itemButton;
public GameObject cancelButton;
private void Start()
{
stageClearImage.SetActive(false);
cancelButton.SetActive(false);
}
public void UpdateUI(int currentStage)
{
stageText.text = string.Format("ステージ:{0}", currentStage + 1);
}
public void HideButtons()
{
nextButton.SetActive(false);
toTownButton.SetActive(false);
itemButton.SetActive(false);
}
public void ShowButtons()
{
nextButton.SetActive(true);
toTownButton.SetActive(true);
itemButton.SetActive(true);
}
public void ShowButtons(bool isTrue)
{
nextButton.SetActive(isTrue);
toTownButton.SetActive(isTrue);
itemButton.SetActive(isTrue);
}
public void PushItemButton()
{
itemButton.SetActive(false);
cancelButton.SetActive(true);
}
public void PushCancelButton()
{
itemButton.SetActive(true);
cancelButton.SetActive(false);
}
public void ShowClearText()
{
stageClearImage.SetActive(true);
nextButton.SetActive(false);
toTownButton.SetActive(true);
}
}
ItemButtonのOnclickに、ItemUISystemオブジェクトのItemUI.ShowItemUI関数とStageUIManagerオブジェクトのStageUIManager.PushItemButton関数を指定します。
BuckButtonのOnClickには、ItemUISystemオブジェクトのItemUI.DeleteItemUI関数とStageUIManagerオブジェクトのStageUIManager.PushCanvasButton関数を指定します。
これでアイテムボタンを押せばItemUIを表示し、戻るボタンを押せばItemUIを閉じることが出来るようになりました。
次回からは戦闘時の処理を実装していきたいと思います。